
Block printing is an art form that really appeals to me because if involves wood carving that ends in a two dimensional piece of art that can be framed and hung on the wall. So you need to have a love for word working and handyperson skills in addition to a good artistic eye and some muscle to make the prints. Block printing is a form of relief printing, relief printing can be done on linoleum or wood. I prefer wood because it can be printed without a press which most people don't have.
Choosing a piece of wood:
Hard wood is the type of wood that has to be used because it will be able to stand up to the pressure put on it when you start printing. I was trained to use maple or poplar. I have tried both and they seem to work about the same. The main thing to look for in a block of wood is that it lies perfectly flat and doesn't teeter when on another flat surface. Don't use porous woods like oak and cherry as they don't cut well and they tend to be too brittle.
Preparing your block:
Once you have chosen and cut your block to size you can prepare your block using a medium grit sand paper, sanding it smooth on the side you are planning on using. It is also necessary to bevel the edges of the front side of the block so they don't cut into your paper when you print. Once you feel that your block is nice and smooth and the edges are beveled you will need to paint the printing surface of the block with watered down, black, acrylic paint. Black is used because it is easier to see what you have cut away on a black surface as what you cut away will become white again.Getting your image on your block:
Now that the block is sanded and painted you are ready to get an image and carefully transfer it to your block. Since your block is painted black it will be necessary to use white charcoal or conte in your drawing so that you can see your lines. If you are really good at drawing you can draw your image directly onto the surface. Remember, whatever you draw on your block is going print backwards in the final image. Because of this it is a good idea to avoid lettering or anything else that could accidentally turn out backwards. I do not like to spend a lot of time in the drawing phase so I use a photo transfer technique. To do this you will need a copy of your image that fits your block. Kinko's is a good place to get a xerox made of your image that in the same size as your block, they even have a mirror image copying mode so you can reverse the picture so it turns out the right way when you print. A good way to transfer an image to your block is take a piece of white conte and rub the back side of your xerox. Once the paper has been rubbed all over place the drawing face up on your block. you can now trace over your xerox with a pencil and the white conte will be transfered to your block's surface.
Carving the Block:
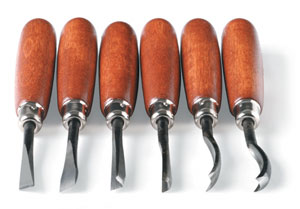
Now that your image is transfered you will be ready to start the delicate and time consuming process of carving. This will be done using special wood block chisels. Dick blick is a good place to buy these. Expect to spend about 40 bucks on a good set. You will also need a wood mallet ( I made on from a piece of wood) and a bench hook (which can also be made from scraps). Carving is done by placing the tip of your chisel on the wood surface and knocking the back of it with your mallet. You should be able to remove a small and controlled piece of wood out your block with some gentle taps of the mallet. Even the finest line carved in the wood will allow an imprint when printing. The idea of chiseling is that all the areas that are removed are going to be white while everything left untouched will be black. This is because when you roll your ink out onto your block it will only hit the high areas that you didn't chisel down. Continue to chisel out all the spots that you want to be white. Chiseling with accuracy can be a difficult task. A helpful way to get straight edges and lines is to use an exacto knife and a metal ruler before chiseling. Put your ruler down and run your exacto blade along the line you want to be perfectly straight. When you get close to an edge you have cut with your exacto knife it can easily be removed and will have the perfect straight edge you want. Chiseling is something that takes a bit of practice to get the hang of so start with the areas of the piece with less detail. To fully chisel out your entire piece should take a good amount of time depending on the detail you have chosen. I would recommend working an hour a day until you are done. The bench hook is a device that is used to hold the block in place using the edge of the table. Without a bench hook your piece will go flying every time you chisel it.
The last thing that needs to be done to complete the block is a layer of shelack. Use a cheap brush to spread it on as it will ruin your brush. Make sure the shelack is completely dry before trying to print.
Printing:
Printing is a difficult and exact part of the process. A professional artist would hire a crew to do this part for him or her since the creative part is over. This is the part where you are going to build some muscle as it requires you to use your arms to rub the back of the paper for quite a while to get a good amount of ink saturation onto the paper. The materials you will need are black printing ink, a large piece of glass to roll the ink onto, a brayer (a small roller for printing), masa rice paper to print on, a wood holding device to support your papers edges while you print (four pieces of wood that you can place around your block will do fine) and something hard to rub the back side of your paper with (I like to use the those glass scented candle lids). Feel free to try rubbing with different things as long as they will not tear your paper.
To start the printing process squeeze some ink onto the glass and rub over it with the brayer. Keep rolling until the ink is a thin layer on the sheet of glass. while you are doing this the brayer will be receiving a thin layer of ink. Now you can roll the loaded brayer onto your completed block. Roll over each area a few times to ensure plenty of ink is on all the surfaces. Go back and reload the brayer as often as needed. The block is fully loaded now. Now you have to put you paper on the ink and rub the back of it for a while. It is a good idea to put some marks on your paper and on your wood mounting system so you can put your paper down exactly where you want it. Moving your paper after you have placed it will increase the odds of marks that you don't want on your paper. When you begin rubbing fee free to carefully peel parts of the paper back while still keeping it in place to check if the print is getting dark enough and going on well. Rubbing the back of the print is a very tiring a difficult process as you have to make the sure the print does not move while you are rubbing it. Another thing that must be taken into account is that your paper is larger than your block. The paper needs to be supported by boards that are the same thickness of your block. Without this you may damage your paper while you do your rubbing.
Block printing is a lot of work but is great experience once you commit your self to the challenge. It also brings a great feeling of satisfaction to do something the way is was done before the invention of modern technology. Go make a print!
The above picture is a block print done by Ryan Morgan of the Salt Lake Temple in Salt Lake City, Utah.

4 comments:
Ryan, That is AMAZING. So beautiful. Are you going to be selling them? Because I think you should. Ensign Books would carry them in a heart beat.
Wow, Ryan, that's a nice block print. Great job! It must have taken a long time to chisel it all out. Keep the works of art coming!
Ace
Love the info...and the SLC print.
yeah ryan is back to blogging!
Post a Comment